Oh, Finals, You Kill Me

Coconut Rum Mousse with Roasted Pineapple, Apricot Sauce, and Coconut Macaroon Barquettes

Coconut Rum Mousse with Roasted Pineapple, Apricot Sauce, and Coconut Macaroon Barquettes

With my new mantra (“Don’t tank!”) firmly in mind, I headed into my next two final exams: Advanced Pastry, and Chocolates and Showpieces. The projects for both classes had been in design for several weeks, but the run-throughs I’d done at home weren’t going smoothly.

The Advanced Pastry practical had been particularly rocky. I knew the flavor scheme I’d put together was solid, but I had tinkered with my main recipe (of course!) to the point where I wasn’t sure it would still hold together and it continued to have some kinks that needed to be worked out. I also changed all the surrounding elements numerous times, which is crazy-making. The pineapple garnish alone I tried five different ways before settling on roasting it. Five different ways. For a tiny garnish. Painstaking.

Trying different bases and other combinations

Trying different bases and other combinations

For Chocolates, I was doing a sugar showpiece to present molded chocolates filled with spiced rum buttercream. Casting sugar is super cool (see “Rolling the Dice With Sugar”) but it is rather unpredictable — and isn’t lack of predictability always a blast in a final exam? (Rhetorical.)

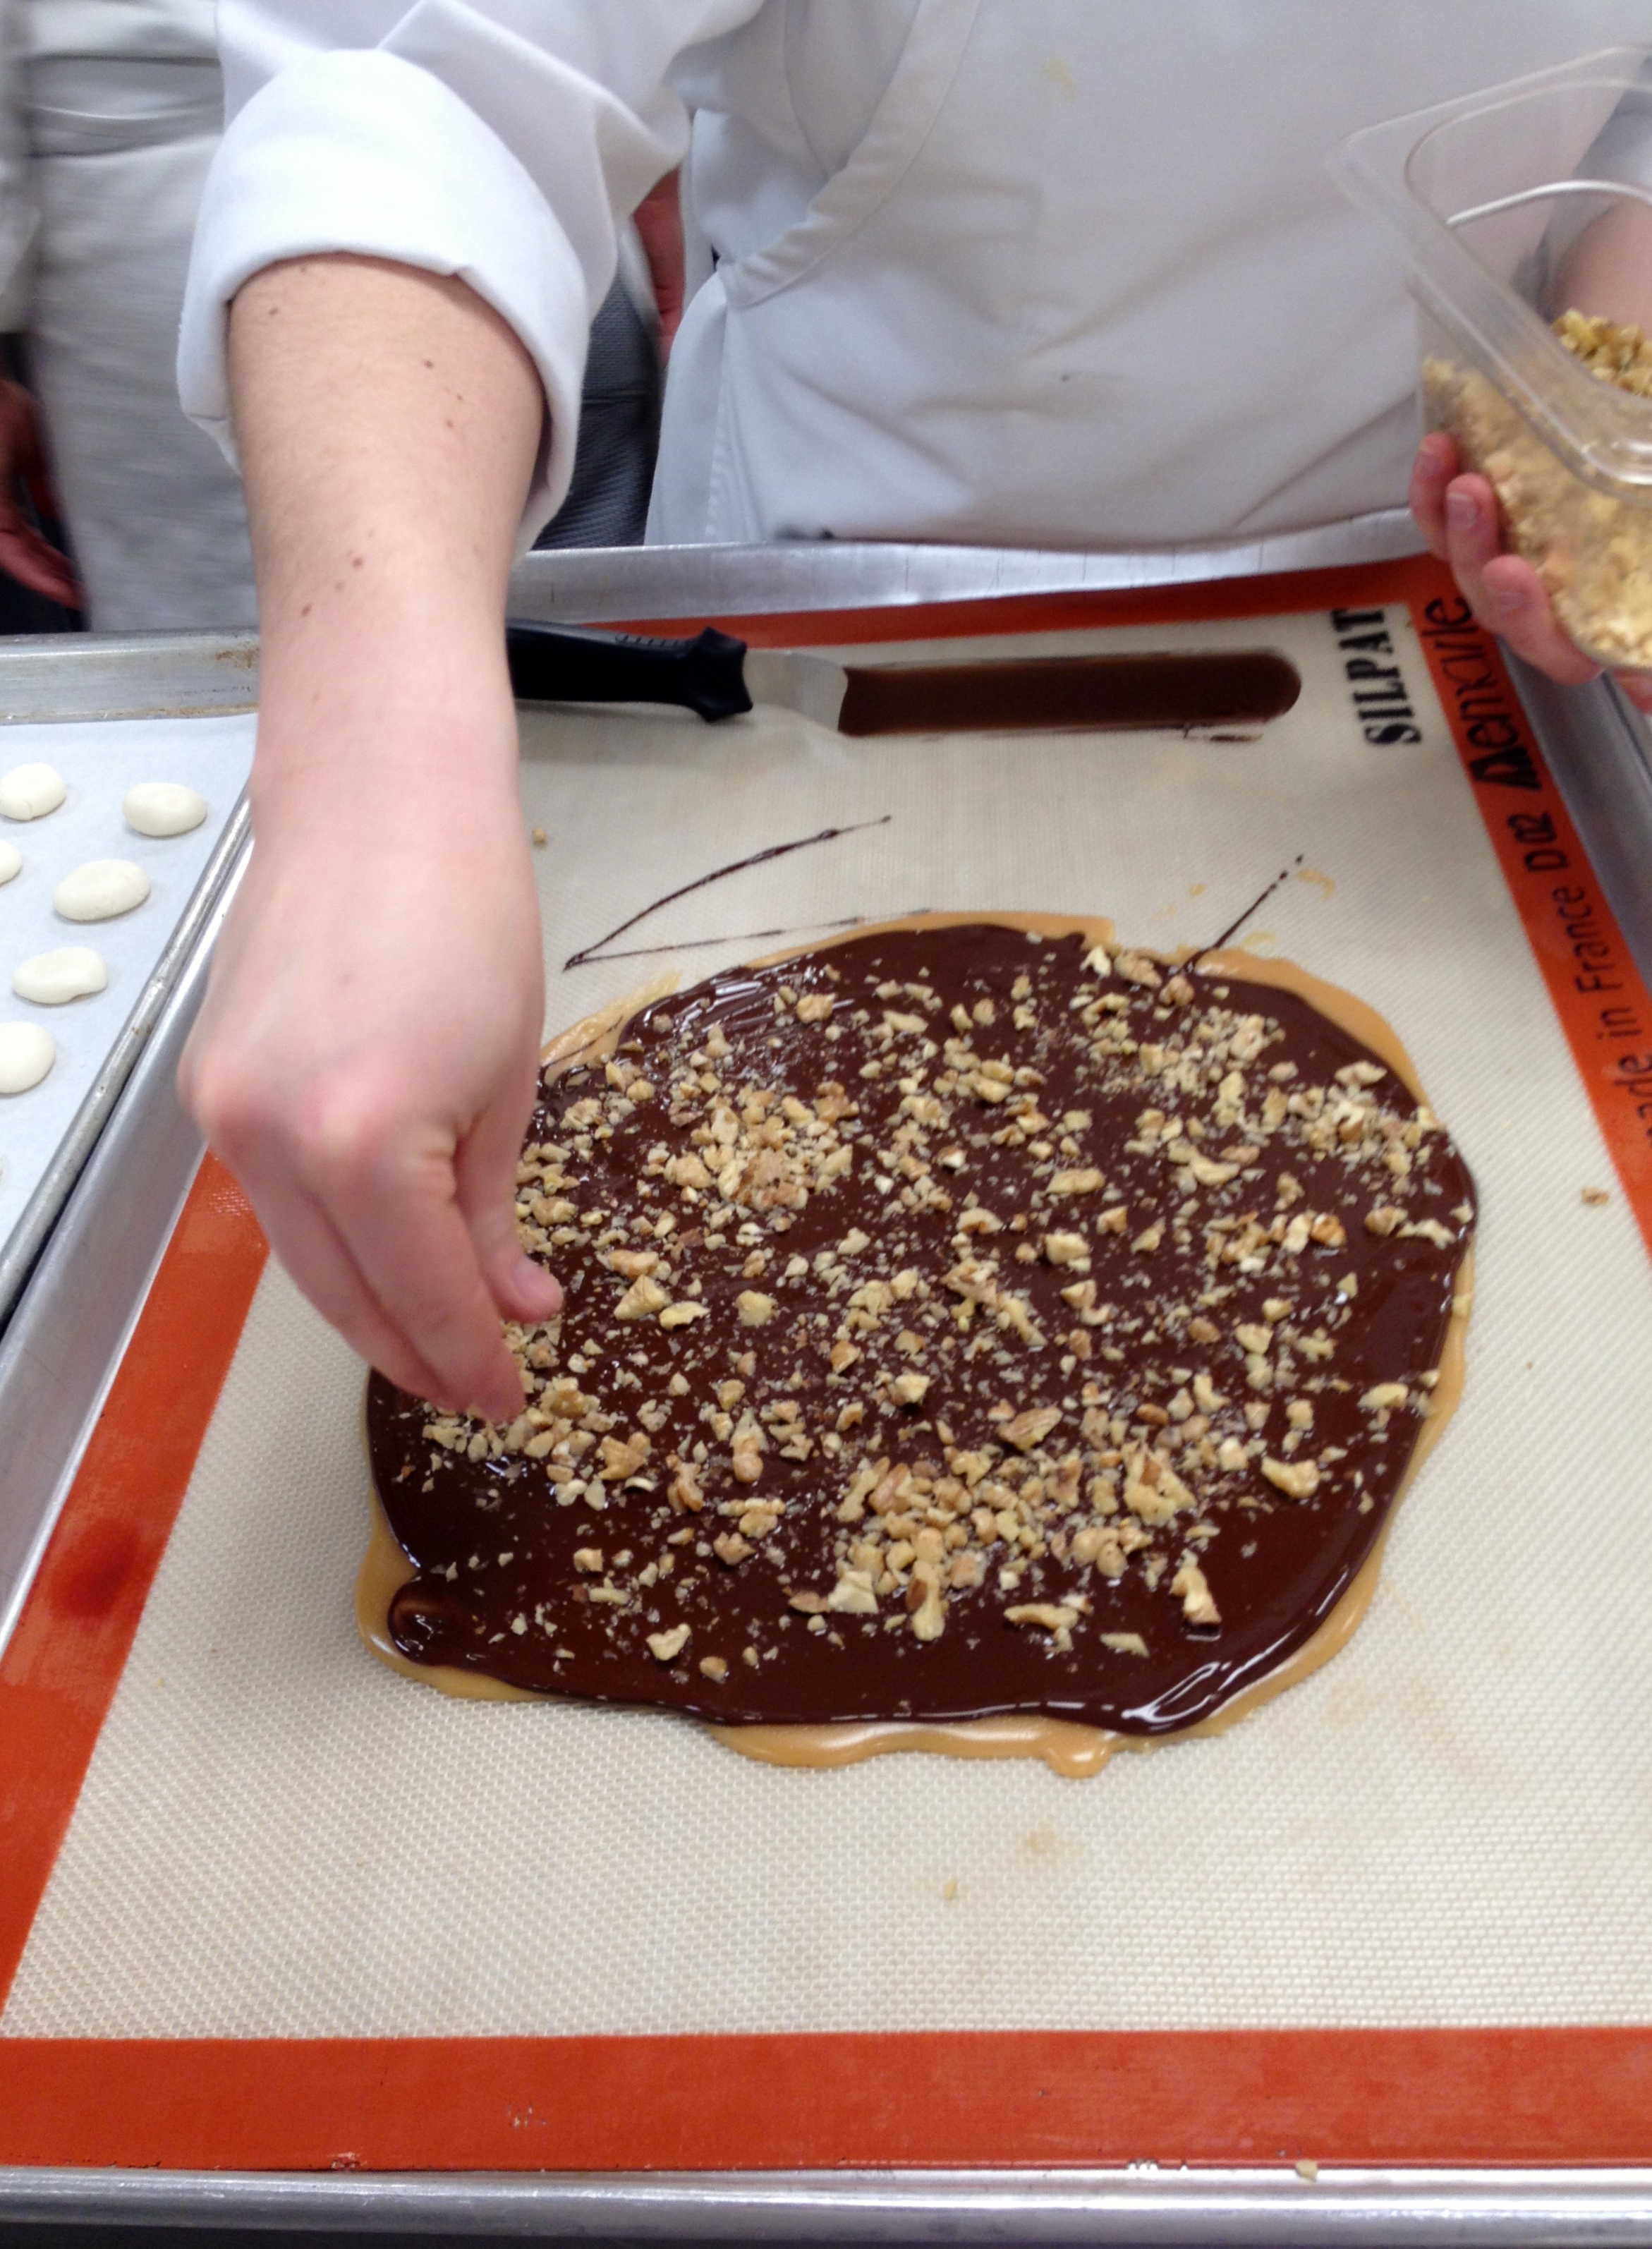
We had only spent a class or two on molded chocolates at the beginning of the semester so my actual hands-on time was limited to one try — and chocolate can be a harsh mistress. To that effect, the trial run crashed and burned, which is always a bit unnerving. Hmpf. It seems none of my lists and copious amounts of notes helped me out when the chocolate chips were down.

I re-did my game plan for the final since I was determined to turn out twelve perfectly formed, glossy, gorgeous molded chocolates come hell or high water.  And it worked. The chocolates turned out beautifully.

And, the sugar showpiece wasn’t bad, considering. The core pieces, by necessity, were made in Week 1, so they had lost a lot of their luster from sitting and had developed a kind of dull bloom. You can try to shine these up with careful application of a torch, but this is risky since it basically heats the sugar to melting again to get it to re-set with shine. The risk is that warming the piece up in this way will deform it. Which it did, when I tried it. Because you know I tried it. Even after the buttercream life lesson in my last post I still couldn’t keep from messing with the pieces to try to “fix them” (make them a little shinier).

There were various other bumps in the sugar showpiece road — particularly the pulled sugar elements, for which my design was far too ambitious. I guess I thought I could pull off lovely, delicate, multi-colored flowers with nothing between my tender hands and that beyond-boiling sugar but a pair of disposable latex gloves — after having tried pulling sugar just two or three times prior.  That was deluded of me. I can barely fold a piece of paper into an envelope without practice let alone construct tropical flower petals from hot sugar. I pulled a vaguely tropical looking water flower and watched all but a few of the petals shatter on assembly.  C’est la vie.

But, all is well that ends well. The Coconut Rum Mousse with Apricot Sauce, Roasted Pineapple, and Coconut Macaroon Barquettes came in on time, the mousse didn’t collapse on its way to presentation, and it all went over well with my chef (at last! Various other incarnations of this dessert got panned repeatedly by various chefs along the way — all of which kept me working away at a combination that would hit all the right technical notes while still satisfying my vision of a fresh, light, fruit-centric summertime plated dessert).

It was an extremely gratifying moment for me when Chef told me he didn’t have a single piece of critical feedback for me. I consider that a parting gift from him since I am sure the dessert wasn’t perfect. In any case, staying on top in that class had been my biggest challenge of the semester and that score is definitely how I wanted to ride out into the Advanced Pastry sunset.

Sugar Showpiece, finished product

Sugar Showpiece, finished product

And the sugar showpiece? It also pulled out a score I was happy with. I took one last look at it, wistfully, as I slid it into the garbage can on my way out of the door. I wasn’t even going to try loading it into my car. There is no way it would have made it home without shattering, and shattered sugar shards in my trunk is the last thing I wanted to deal with. But the chocolates? They came home with me.

Buttercrunch Toffee

Half Batch of Pecan Buttercrunch

Half Batch of Pecan Buttercrunch

I’ve always been a fan of toffee — one Christmas I received a big can of Almond Roca in my stocking and thought I had hit the jackpot — but never considered making it at home. Candy thermometer? Tempering chocolate? Forget it. But, we are in the Confections section of my Chocolate and Showpiece class and toffee was on the docket.

It turns out it’s not so hard. To eliminate any stress, though, I do recommend a candy thermometer. They’re fairly inexpensive and sugar is extremely temperature sensitive — a few degrees difference in heat makes an enormous difference in the outcome of your confection.

As for the tempering, you can sidestep any of the rigamarole associated with large-batch tempering, which can be very touchy for even a moderately experienced baker, by using a shortcut. Here’s the thing about the shortcut, though — you have to do it as described. Don’t shortcut the shortcut.

This recipe is adapted from Chocolates and Confections by Peter P. Greweling, CMB. Chef Greweling, an instructor at The Culinary Institute of America, is quite precise in his discussions about chocolates and confections. The depth with which he discusses the topics might seem intimidating but the photographs, which are gorgeous, are inspiring.

The recipe is written to yield 60 oz., which is quite a bit of toffee for an average person. We made a half-batch in class, split it between two people, and both had a decent amount to take home with us.

We also only coated one side of the toffee in chocolate — easier, faster, and quite sufficient — which means that if you only want to coat one side with chocolate you would want to cut the amount of chocolate, nuts, and the salt for the nuts (not the salt for the toffee mixture) in half for a whole batch, or quarter it for a half-batch.

Pecan Buttercrunch

Yield: 60 oz.

16 oz. butter, melted
16 oz. sugar
3 oz. water
1 tbsp. vanilla

24 oz. dark chocolate, tempered (see below), for coating — use bars, not chips
16 oz. pecans, or other nut, toasted, chopped and salted
2 tsp. salt

Instructions:
Note: Have a silicone baking mat and an off-set spatula or rubber spatula laid out and ready for the hot toffee when it comes off the stove. You will need to work very quickly to get it out of the pan and spread smoothly on the mat before it cools.

Combine the butter, sugar, water, and salt in a saucepan. Bring to a boil, stirring constantly.

Once it comes to a boil, continue cooking over moderate heat to 298 degrees Farenheit while stirring constantly. Do not be concerned if the sugar seems to sit at a certain temperature without budging for awhile. Just keep stirring and watching — the temperature will shoot up suddenly.

When the mixture reaches 298 degrees, take it off heat and add the vanilla extract. Stir well. Pour quickly onto the silicone baking mat and spread to desired thickness before the toffee sets. Allow to cool completely. I suggest not working the toffee too much once you pour it out — just smooth it quickly to the thickness you want. You will be breaking it into irregular pieces, anyway, so you don’t need to fuss with it too much at this point.

While the toffee is cooling, temper your chocolate.

Tempering Chocolate by the Direct Method

This shortcut is good for relatively small amounts of chocolate. You want to use bar chocolate, not chips, because chips generally have vegetable oil or other emulsifiers in them — they won’t harden back up the way you want.

Chop the chocolate into small, even pieces and place in a microwave-safe bowl. The goal is to heat the chocolate very, very slowly. Do not rush this. Microwaves, and the amount of chocolate you are using, vary so it’s not possible to give precise times for this but start slowly. Microwave for about 30 seconds — you can even reduce the power on your microwave to 50% if you know how — and stir it well. It should have melted a little. Microwave it again and stir it. Keep doing this, stirring well each time you take it out. When the chocolate is about 85% melted but still a little chunky, just stir it until the chunks melt and the chocolate is smooth. Expect this process to take about 6 turns (or more depending on how much chocolate you are tempering) in the microwave.

The most important part of this process is to not overheat the chocolate in any way. It’s easy to burn chocolate, which would be a bummer, but even more importantly, chocolate that is heated too high, even if it doesn’t burn, may not set properly. You are only heating the chocolate enough to get it melted and smooth.

Now the chocolate is ready to pour over the toffee.

Once the toffee is cool, blot it with a clean towel to remove any excess oil from the surface which would prevent the chocolate from adhering. Coat one side of the toffee with half of the chocolate (or, all of the chocolate if you are only coating one side) by pouring it on and smoothing it out with a spatula. Immediately sprinkle the toasted, salted nuts onto the chocolate. Allow the chocolate to set. How long it takes chocolate to set depends on how thick you poured the chocolate, etc., but I’d say give it a good 20 minutes to start. Turn and repeat on the other side of the toffee if you are coating both sides. Break into desired-sized pieces. Store protected from heat and humidity.

When fresh, the toffee should be crisp and crunchy to the bite. As the toffee picks up moisture from the air, it will become softer to the bite and stickier to chew.

And It’s Off To The Races!

Spring semester's textbook line-up.

Spring semester’s textbook line-up.

It’s a new semester here in Maryland and we like to do things right so the first day of Tuesday/Thursday classes started with a two-hour snow delay. This didn’t impact me since the English Composition class I am teaching doesn’t run until later in the afternoon so it was business as usual for me. I dusted off that scant inch of fluffy white snow and carried on organizing myself for another 4 1/2 months of being a teacher and a student.

I’ve been teaching for a long time but I still get nervous on the first day of class. There’s all sorts of tricks of the trade for creating a classroom culture from scratch but teaching is still part alchemy: will they like me enough to buy into what I’m selling? Can I turn this group of strangers into a cohesive, communicative band of critical thinkers? Is Mercury in retrograde? Because I have 15 weeks to get them from Point A to Point B and I gotta tell you it’s always a crapshoot.

So, that was on my mind, but even more on my mind are the classes I am going to be taking: my final semester of Baking and Pastry. My capstone courses. The litmus test courses: Advanced Pastry, Intermediate Cakes, and Specialties, Showpiece and Chocolate. The syllabi are longer; the bar is higher. Or, maybe I am being over-dramatic, as usual, but I don’t think so. I can tell just by the way the Course Outlines are laid out that we’re meant to be firing on all cylinders (Mmmm hmmm, I’ve read all the Course Outlines already even though our classes haven’t met yet. If you’ve been reading this blog you can’t possibly be surprised by that.).

Pretty, no?

Pretty, no?

Inside front cover of "Chocolates and Confections"

Inside front cover of “Chocolates and Confections”

The books are gorgeous. And I’ve actually been waiting to take Chocolate and Showpiece since I got here, so I’m really looking forward to that. Although I’ve never cared much for eating chocolate myself, I fell in love with the idea of opening a hot chocolate bar almost fifteen years ago — so much so that I bought books devoted to hot chocolate recipes and drafted plans and menus in my Planning Notebook after the section on crepes and before the section on humble cakes.  (I’ve been planning baking businesses for a very long time.) I even made a point in my younger days of going to Cadbury World when I was in England, the chocolate shops when I was in Belgium, and Hershey’s Chocolate World in Hershey, PA to see this industry that is chocolate.

Cadbury World, England, 1997. My host was puzzled by my request to go here.

Cadbury World, England, 1997. My host was puzzled by my request to go here.

Clearly, I never opened that hot chocolate bar. I went to graduate school and started teaching instead. Then, about five years ago, I again became very intrigued with chocolate as a medium — so much so this time that I actively went out and tried to cultivate my chocolate palate. Yes, I tried to teach myself to like chocolate. And I did, to an extent. The whole world likes chocolate so I figured it behooved me to figure out what the deal was so that I could trust my judgment when making chocolate things.  It was working with chocolate the last time that got me into home coffee roasting, as a matter of fact, including the hunt for the elusive Poppery II Popcorn Popper, the vintage home popcorn popper which doubles as the coveted home coffee roaster, but that’s a story for another day.

The goal for beginning home coffee roasters: Poppery II

The goal for beginning home coffee roasters: Poppery II

The elusive vintage Poppery II. I found this one in a thrift store along the coast in Northern California.

The elusive vintage Poppery II. I found this one in a thrift store along the coast in Northern California.

Sweet Maria's sells all kinds of "green beans" through mail order. Or, you can walk into their warehouse and buy them off the floor like I did, but that was a little awkward.

Sweet Maria’s sells all kinds of “green beans” through mail order. Or, you can walk into their warehouse in West Oakland and buy them off the floor like I did, but that was a little awkward.

In any case, it turns out that chocolate is kind of a trip, so this class — and the other classes, too — should be pretty cool. Stay tuned to see what we make.

Will it be Buttercrunch?

Will it be Pecan Buttercrunch?

Or perhaps Sleeping Beauties?

Or perhaps Sleeping Beauties…???